DIY iPhoto Calendar

Featured

Image

Did you know that you could do this? Although I do love what you get back from Apple when you order through them, but sometimes you need it NOW or don’t want to spend the money on one for yourself…the latter in my case.

Anyways, I figured out how to make one by printing the calendar to a .pdf file first. Then I printed all the photo pages of the .pdf file onto photo paper and then the months on card stock. Then I laid out the pages so they would hang the way a wall calendar would i.e. cover, photo page one facing first month; photo page 2 backed to first month and facing second month and so on.  I also added a transparent page over the front cover to make it look nicer. Once I finished that, and double checked the layout, I took it to Staples and they bound it for me for less than $5!

Now, if you have a laser printer, you could omit the special photo paper and print your .pdf (omitting the cover page) pages back to back in “long edge” binding style in your print options box under manual duplex. You will need a laser printer that prints two-sided to do this. Then print out your calendar cover on card stock.

If you need any instruction on how to create the calendar in the first place, let me know and I’ll see what I can do for you on that.

Enjoy your day…Erin

Bottle of Boos

Today’s project was inspired by this cute little thing I came across on Pinterest. I decided that I wanted to make a couple to use in my neighborhood “Boo” basket.

Find a bottle of your choice. I used a Matua Valley wine bottle because it has this light green tinge to it that works well for Halloween. The label came off in one piece as I peeled it back under running hot water but I had to use my Xacto knife to remove the neck label as it is made of soft metal.

To drill the hole at the bottom back of the bottle for the lights, I used my Ryobi drill with a 1/2″ RIDGID Diamond Tile Drill Bit which was a little pricey at $17 but it worked perfectly and didn’t take more than five minutes to get through each bottle. NOTE: Remember to wear your fashionable safety glasses and to stop every minute or so to add a little water onto the spot you’re drilling. Afterward, I used my Dremel with a grinding bit to smooth out the cut a bit.

I poured in the bottle some BEHR Premium Plus Pearlescent in White Opal that I had on hand from my master bath redo. I thought it might give the interior a “ghostly” effect but it did take a bit to dry, so make sure it is completely dry before inserting your lights or it will mar the interior finish of the bottle.

Next, I used my Silhouette Cameo to cut the label out of vinyl. Then I cut out some little extra “spooky” images to add a little something extra. To finish the bottle off, I painted over the logo on the top of the cap with a little white paint and let it dry. Then I added a little design on the very top using the Cameo and a scrap of black vinyl…see here!

I happened to have several strands of these little floral
lights that run off 3 AAA batteries which I used inside the
bottle. I threaded it through the bottom hole and up to the neck. At the top of the neck I placed a little hot glue and attached the light string, then I dropped the rest of the string back down into the bottle.

Lastly, I used a little black electrical tape to tape up the bottle and make it look like it hadn’t been opened.

I think it came out rather cute…don’t you?

Completed Bottle of Boos

Subway Art Quilting Blocks

So I got another idea of a way to use subway art for a gift. My nephew came to mind, because his birthday is coming up. Originally, I thought about making him a pillow with his name, birthdate, how old he is this year and areas of interest. But, then I thought, why not make a quilt square each year with how old he is and areas of interest. Then for a milestone birthday, I could put them all together to make a quilt.

This is a sample of the first square, which would have the details of his birth. By the time my nephew has his 18th birthday, I will have 18 squares. I’ll definitely need additional squares to make a whole quilt. A good idea for those squares, his outgrown clothing. How great would that be?

Online you can find many methods to transfer your image onto a piece of fabric. I recently came across this one from the Graphics Fairy.

This gift is along the same lines as the add-a-pearl gift from Long’s Jewelers. Yearly, we give our niece a couple of pearls and every other year or so we have them restrung for her. Hopefully by the time she graduates or gets married, she’ll have a whole necklace.

Customized Church Pew

My mom purchased this simple style church pew many years ago at an antique store in Bolton, MA. She used it on various occasions for extra seating on her deck and since gave it to me.

Recently, I decided that I would use it on my new deck, but first thought I’d update it by  chalk painting it. Now, it’s not like it sounds…It is actually paint with chalk in it. I used this recipe (also below) that I found online because I already had all of the ingredients on hand and the brand name chalk paint costs $39 per quart..YIKES! Supposedly, you don’t need to prime the piece beforehand but I did sand and prime it before painting on two coats.

1 1/2 cups paint
1/2 cup hot water
1/ cup plaster of paris

First, I diluted the plaster of paris in the hot water, then added in the paint and stirred well. I rolled on the paint with a high density roller and then used a brush for the nooks and crannies.

When it was done, I wanted to add a little something to make it special. So I surfed the web for an idea and found some funny sayings/quotes as well as some more serious ones. Here are a few that I found.

  • There is a broken heart in every pew
  • When it’s foggy in the pulpit, it’s cloudy in the pew
  • Chinese proverb: Boy who go to church with dirty underpants, sit in “pew” for one hour
  • I must find out what zees “pew” means every time I appear” Pepe le Pew
  • Do not come wiz me to ze Casbah – we shall make beautiful musicks togezzer right here! Pepe Le Pew
  • If we had more hell in the pulpit, we would have less hell in the pew. Billy Graham
  • Some people are kind, polite, and sweet-spirited, until you try to sit in their pews.

Since I love all things Jane Austen and found this little quote and I used it: “To sit in the shade on a fine day, and look upon verdure is the most perfect refreshment.”

So I sent my pew up on two chairs, one at either end, and across from it a stepladder. I placed my Artograph TRACER projector (which I purchased at my local craft store with a 50% off coupon) onto a step at the correct height for my piece and made sure the image was level and centered. Then using a watercolor pencil, I traced the text projected onto the pew. The watercolor pencil removes with a damp cloth allowing me to fine-tune any mistakes I made. Then I experimented with several mediums to permanently set my text. My Fine Line DecoColor Opaque Paint Marker worked like a charm. After that was dry, I went back with a damp paper towel and removed any leftover water-color markings.

Black DecoColor Opaque Paint Marker

Paint in a stick

Aquatone Watercolor pencil by Derwent

Lastly, I added in a bit of black detailing into the lines carved into the bench. Then I waxed the whole piece with Minwax Paste Finishing Wax. But…before doing so you’ll want to seal your text as the wax will smudge it even though it’s permanent.
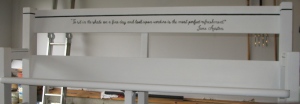
Painted Pew

Family Room Book Ledge

For a while now, I have wanted to display some of my books in the family room but the room is already pretty full of furniture so there was no room for anything more. The only option that I saw was to use a bit of wall space. This is the wall I chose, out of the way of traffic but accessible, though I will have to find another home for my stars.

So I went to my local hardware store and walked up and down the aisles of molding looking for something that would be simple to use. Off on the end, were these wooden corner protectors which sparked an idea.  

When I got them home, I cut them to the size I wanted using a mitre box. After lightly sanding them, I put on a couple of coats of water-based clear satin finish Polycrylic. I bought this previously to finish off the top of our handmade boat dock coffee table. I’ll save that for another post.

Before hanging, I had to put Romeo in the kitchen because he was going crazy at the sound of the drill and it was driving me crazy!

Then I located the studs with a stud-finder, marked them, making sure the placement holes were level. Then I pre-drilled the holes into the wood, and screwed the wood into the stud using wood screws. Once the books are up, you can’t see any of the six screws that are exposed. You could counter sink them if you prefer.

A note on the corner protectors: they are shallow so you can’t put anything on them that won’t lean against the wall and stay on the ledge. The books I wanted to display were thin so it wasn’t a problem.

I think it came out wonderfully, don’t you?

Cabinet Door Repurpose #2

This week, I decided that I’d make a magnetic board out of the second cabinet door I picked up at our local Restore.

Cabinet Door as Magnetic Board

with Romeo

I found a 4 oz bottle of magnetic paint in the Martha Stewart craft line. I did find some other brands on Amazon but they were either way too pricey or didn’t get very good reviews. Martha’s product had mixed reviews, but cost only $4 for the 4 oz bottle so it was worth giving it a try.

I lightly sanded the surface I was going to paint and taped around the same area making sure to press down the edges to prevent bleed through.  Then with a high-density roller, I rolled on the paint. Now I have to tell you, this stuff is not easy to work with. No matter how I applied it, I couldn’t get a smooth finish. Eventually, I thinned the paint with a smidgen of water, which helped it go on a bit smoother, but it still isn’t as smooth as I’d like it. I ended up using the whole bottle for this project. Note: The surface is only slightly magnetic allowing it to hold things that are very lightweight.

I also used my Silhouette Cameo for the image on this board too. I adjusted the fleur-de-lis to size, cut it out of contact paper and used Glad Press’n Seal to transfer the image to my board.

Cameo image transfer

Then I traced the image within the stencil with my white water-color pencil, and then colored it in. Then I took a small paint brush with a touch of water and smoothed out the white and this is the result. I like the chalky effect it gave the image.

Completed magnetic board from cabinet door

I used the same hanging mechanism that I used for the blackboard. Make sure you get the appropriate hanging hardware for the weight of your project or it could fall off your wall.

Now, I if I can just commit to where I am going to hang it!

Cabinet Door Repurpose #1

A few weeks back I picked up two nice looking cabinet doors at our local Restore (Habitat for Humanity) for $5 each. I thought they would make great organizational boards. I had originally thought I might cut out the center and create a bulletin board out of the larger one, but changed my mind today when I realized I had some blackboard paint.

Cabinet Door

I lightly sanded the surface that I was going to paint and taped around the area I was going to paint, making sure to press down the edges to prevent bleed through. Then with a high-density roller, I rolled on the paint for a smooth finish. When it was dried to a flat finish, I rolled on a second coat.

When it was done, I thought it needed something more. I used my new Silhouette Cameo to create a stencil of the image below and then used acrylic paint to stencil it onto the board. I think it came out nicely.

Tomorrow I’ll put the hanging hardware on the back and then find a place for my new board.

Enjoy your day….Erin

What this is all about

My intention of this blog is to share my foray into all things creative such as interior design, craft projects and art. For as long as I can remember, art has been a part of my life.

After my grandmother passed away in 1989, we were going through her things and I found a little clay fired duck that I’d made when I was in Kindergarten in California. It brought tears to my eyes that she saved it after all those years.

I’m in the back on the left

In high school, I took as many art classes as I could. Senior year, I entered a AAA traffic poster contest and one first place in the state, and second nationally. The poster has since been lost or misplaced, but here is a photo of me with the local PR Director of AAA and other winners.

It seems I’ve always had my hands in something creative whether it be interior design, entertaining, cooking or various craft projects. So I thought I’d put down in words and pictures the projects  I undertake and my experiences with them and hope you find something useful in them.

Image

Hello world!

I suppose I should explain the nature of my blog’s name, A Girl, Her Knight and Her Romeo.

Wedding DayWay back in 2001, I was laid off from a job on my one year anniversary there…can you believe that! The Internet crashed, and I was an events & marketing specialist in the HR department of a huge computer media company. I was devastated to say the least. The HR person actually told me that they didn’t recommend me calling anyone until after work hours so I wouldn’t spoil their day too! Can you believe that? Ignoring that idiot’s recommendation, through tears on my drive home, I called my boyfriend. He consoled me and met me at home and soon as he could. I was sitting in the living room chair of our apartment crying when he got home. He came right to me and I told him all that happened, he responded with all the right things…and I told him so, that he was my knight in shining armor. By then he was down on his knees in front of me, and then said, that he wanted to always be my knight in shining armor, and then asked me to marry him! Oh my did that take away all the hurt from earlier in the day!

Flash forward to May 2012, a few weeks before Mother’s Day. I received an email from adoptapet.com letting me know that a dog matching my search criteria had entered a shelter and was up for adoption. Six months prior to this, I’d filled this form out online of what I’d like in a rescue dog. Since then I’d received several emails of various dogs but didn’t’ see anything acceptable. You see, I have A LOT of allergies, and I mean A LOT! Dogs being one of them, but not all dogs…so one of the parameters was for a hairy dog, not furry one. It also had to be small, not necessarily a puppy, but a dog that was going to

Baby Romeo

remain under 10 lbs; and I preferred a light-colored dog. Anywhoo, I received the most adorable picture of a puppy in a rescue shelter in TN. He was roughly 3 months old, part Chihuahua and part Yorkshire Terrier (Yorkie), aka Chorkie. So I looked into the shelter’s adoption process and completed the paperwork. Within 24 hours, I received an email saying they’d like to do a phone interview with me. So the next day I had a lovely conversation with them about the puppy. By that night, they told me that I could have him but would have to wait two weeks before I could get him because he was in the midst of his shots and he’d need to be quarantined from other dogs beforehand. So on Saturday, May 12th my husband and I drove to Londonderry NH to rendezvous with Pooches on the Move at their last delivery location. Pooches on the Move transport newly adopted pets from the south up the northeast corridor on a weekly basis. As the van pulled in, people piled out of their cars to meet it. After about 8 dogs were introduced to their new owners, one by one, they called me over. Then one of the volunteer drivers went into the truck and brought out this adorable puppy. The crowd responded with a big “awe” as they introduced me to my little Chorkie, Romeo.

Design a site like this with WordPress.com
Get started